Starter/Learner Tinderbox document: suggestions?

Hi,

Following much good advice, I am going to start learning how to use Tinderbox (having worked my way through the Getting Started Tutorial) by attempting a focused document. I have kept lists of Questions & Answers in other programs. I would like to do so in Tinderbox (this is truly one of the biggest note-taking tasks I have).

In short, I want to create a database of questions and answers using Tinderbox.

Any suggestions?

I’d like the following:
. Notes have a similar format
. Notes be grouped by specific topic (real examples: Zwift, Tinderbox, Lightroom).
. Topics be grouped by type (software, hardware, painting, woodworking).
. Answers be readily seen.
. Answered questions be visually identified (and/or grouped).
. Ability to indicate whether a question has been posted/asked elsewhere/of someone.
. Link or note of location/person posted/asked. Date of same.
. Link or note of where answer found.
. All quickly searchable.

Of course, this is just a start, but it seems a good place to start for learning as well. I have some sense of how to use some of the tools introduced in the Tutorial for the features I’ve listed, but (also of course) I don’t have the experience to lay out an un-brambled path towards my goal. Use a Badge to mark Notes that are Questions and change the Badge when answered? Via a Stamp? Create Notes with a Prototype? Automatically, via a parent Note? With Key Attributes? And how to as seamlessly as possible record a question when I have one while I’m working?

Just for starters :blush: .

1 Like

I would start with a basic approach. Make containers for each “domain” (Tinderbox, Zwift, Lightroom, woodworking, and so on). Put the questions into the containers as children. And then put the answers into the question containers. So, here’s a possible hierarchy:

Lightroom
-- What's the best practice for selecting images to Develop
-- -- answer 1
-- -- answer 2, etc.
-- What's the best practice for publishing images to Tumblr
-- -- answer 1, etc.
Zwift

You could have a prototype with key attributes for domains, one for questions, and one for answers. I would make rules so that things like domain topic, or question, populate downward into the children.

Now, that’s a way to do it using an Outline. If you want to flatten this and use a map instead, you could use adornments to represent the domains, colors to represent question notes versus answer notes, and links to visually tie it all together.

Agents, attribute browser, the roadmap view, and other features can help to explore the knowledge base as it grows.

I’m sure this suggestion will generate questions and other folks’ comments about how they have done this. So I’ll stop there.

Word of caution: it’s best to start these sort of projects with just a basic structure and then over time let the document evolve as the best structure for your knowledge base emerges while you populate it with notes. In other words, don’t get deep into thinking of design (what badges to I use, what stamps would I need). When I get lost into design I forget the whole point of why I was doing the project. Perfection is the enemy of progress.

1 Like

Well, I hope this doesn’t get too meta, but I would turn your list into a set of questions:

  • How do I create notes with a similar format?
  • How do I group notes by specific topic?
  • How do I group topics by type?
  • etc…

and then go to work answering the questions, and applying what you learn to the document itself.

I commend both the last answers. Trying to bend the as-yet-not-learned toolbox bend to a conceptual model if far harder then thinking about the toolbox’s features you project might involve and learning each of these before adding it to your burgeoning proctor file.

For instance, is a badge more useful a state indicator? First it help to know how so set each of these, first via the UI and then, for effective use at scale, via action code. Do these test in a new file so you’re throwing away test detritus. Otherwise you hit the problem of a seeming bug but which is actually a forgotten/broken earlier test in the same file. Once you know how to set various features, look at them in several different views - certainly thus you might use. Don’t overlook Attribute Browser as it can save a whole farm of reporting agents you felt were needed but which you view infrequently - AB view may deliver that far more quickly when needed and with less background overhead. It may be your style makes it sensible to use a badge (for one view 's purpose) and colour (for a different view). Taking this incremental path also teaches you general automation techniques helping bootstrap your knowledge enabling you to try more complex things.

You will find some limitations along the way, but this will enable you to build your project within the capabilities of Tinderbox’s toolbox. It avoids the scenario of over-investing in an imagined outcome before understanding if it’s a possible (or indeed optimal) approach within Tinderbox.

For early steps, don’t overlook the tutorial PDFs in the Help menu. Once you get going remember there’s aTbRef as a functional reference on what things do (as opposed to how/why to use them). If you get stuck, ask us fellow users here. Good luck.

1 Like

All of the advice here is excellent. I might underscore the perhaps non-intuitive step, referenced by @mwra, of applying one of Tinderbox’s “advanced” seeming capacities relatively early, in addition to becoming familiar with the basics of note construction etc.

That capacity is in fact the Attribute Browser, which is something I use all day long with different Tinderbox files. Its power is allowing you – without constructing agents or queries or anything similar – to group and display your data by any criterion you have in mind. For example, if you’re adding a Topic or Theme or any other tag to your info as you enter it, the AttrB can then display all your data grouped by topic. You can limit the display to items that meet certain criteria. (Simple examples: tasks grouped by Due Date, excluding those with no set due date – or a date more than a month in the future.) For numeric or financial data, you can see it grouped by category – or date, or payee, or amount.

You’ll find extensive descriptions and screen shots:
Here , which is the most detailed thread; also
Here ; also
Here; also
Here

And each of those will link you to more. Once the concept of the Attribute Browser clicks for you, I think you’ll find it a natural way to do a lot of what you have in mind. Here’s a sample screen shot from one of the previous discussions, showing research notes grouped by theme.

1 Like

The starter TBX is a great resource. One thing I have run into as I used it to set up a Timeline is that the agents don’t show the “found” children in outline view. I can only see them in map view. For example, I have created a list of board meetings for various schools and I want to sort out the Board retreats with an agent that seeks the word “Retreat” in each Name. Its attributes show that there are “children” but it is grayed out.

04%20PM

Thanks for any thoughts on how to see the results in outline view.
Pat

$ChildCount is a read-only attribute. That’s why it is greyed out in the KA list. The screen shot you show is the text panel of an item (the agent you mentioned?). If you want to view the results of the agent you need to be looking at the outline itself. Perhaps you’ve hidden the outline by dragging the text panel all the way to the left of the window?

Every view is capable of showing the content of every container – if you are not seeing the agent results in the outline perhaps it’s because you’ve hoisted (focused in on) a different container in the outline than what are looking at in the map?

Try creating a new outline tab. This should open at the root of the outline, showing all containers including your agent.

Thanks. I was in Outline view and did not screenshot the whole text. For some reason, I just moved up the agents to another place–they were below the events in the timeline–and they worked in outline with all of the results available below them. Not sure why they did not work otherwise.

Thanks for responding and I may have solved my own challenge. Thanks, Patrick

There are far more experienced voices that have weighed in, but my tip reinforces what they have said: allow your document to grow in both mass and complexity as you learn ways of doing things and the possibilities they afford.

That’s one of the beauties of Tinderbox – you can evolve your document as your understanding evolves, so you don’t need to worry about getting it right out of the gate. Just get your data in to start, and you can always change it later. Outside of the underlying engine that drives the stuff you’re doing, you’re not locked into a canonical model that someone else has devised. The open-ended, sandbox nature of the application is what makes it both quite daunting to get started but so rewarding to dig into. I can almost guarantee you that you’ll hit roadblocks along the way, but if you come here and post well-defined examples of what you’re trying to do with perhaps what you’ve tried so far, you’ll more likely than not get great answers. But you’ll also discovers answers yourself along the way, and lightbulbs will go off that will illuminate ways forwards that you hadn’t thought of before.

This is going to sound very esoteric, but working with Tinderbox has for me become more than just a way of capturing, viewing and teasing out the interplay of information. It’s also a kind of mind yoga – the doing of which is a benefit in and of itself. That’s obviously not the primary intent of the application, but I’ve found that the Tao (if I’m using the term correctly) of it all helps me with the goal of getting meaning and structure out of what I’m putting into it.

In closing, my suggestion is to let Tinderbox come to you and vice versa. Don’t force it. It’ll happen organically as you work with it. This post probably won’t make much sense to you right now, but it might in a few months. Good luck!

2 Likes

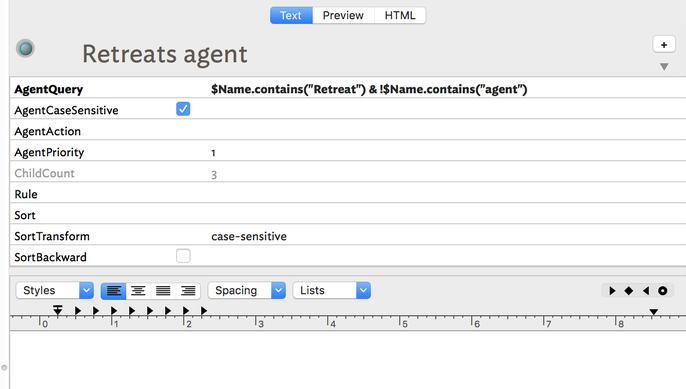
FWIW, bear in mind that in agent queries (noting that find() differs slightly):

  • If an original note matches the query it it is added as an alias, trumping any aliases (manual or agent) elsewhere in the doc.
  • If an alias of a note, but not its original, matches the query (e.g. due to a query term like descendedFrom()) the first matching alias, _by outline order ($OutlineOrder) is added to the agent. If more than one such alias is a match only the first is added.
  • In summary, each note is only every matched/listed once in an agent even if both the original and one-or-more aliases match the query. Thus, an original match always trumps a match to any/all aliases regardless of outline order. If alias(es) but not original matches the first alias by outline order is matched. This conforms to agents only matching each note a maximum of one time.

For historical reasons, inside() matches aliases as well as original. This allows a n agent to matching within another agent, though otherwise may result in unitised matches. In any query, add the term $IsAlias==false to ensure an alias can never be a match.

Conversely a find() returns the path of every matching instance of a note, i.e the original and every alias, where such items match the find query.

My experience is that, in structured docs (i.e. large outlines, not a single-map doc), it can be useful to:

  • Place your agents that the end of the outline, unless they need to be elsewhere for structural reasons, e.g. for export purposes.
  • Be aware of agents and find() queries matching aliases when you intended to match only originals.
  • If using non-unique note titles ($Name), e.g. for the same structural container in different outline branches, give due consideration to starting queries with a scope-narrowing term like descendedFrom() to ensure the rest of the query is only evaluated within that branch of the outline.

Also, I commend @doublem’s suggestions above. Work with the app rather than, as all too often occurs, simply try to force it behave like some other app with which one is more familiar. Think of Tinderbox as a toolbox rather than a single purpose app—be it GTD, QDA, zettelkasten, reference manager, timeliner, contact manager, process analysis, etc., etc. Tinderbox isn’t optimised for a single such purpose for the simple pragmatic reason that what suits one narrow purpose may not suit—and indeed, make harder—some other types of equally legitimate task.

If reading this and spinning your wheels to get started, good advice is to step back from measuring how close your experiments are to your (imagined/desired) outcome and break the process down into a series of tasks; i.e. looking in the toolbox for the appropriate tools. If that is too abstract an approach (we’re all different!), describe your task here as a new thread in the forum as your fellow users here reflect a lot of expertise both in use of the app and in different uses of it. As importantly, sometimes just describing one’s problem unambiguously to another person helps give new insight on the problem as it tends to lay bare hidden, untested, assumptions—often incorrect—as to how Tinderbox works.

1 Like

Thanks for the insights, Mark.

1 Like

Upon review, I meant to thank “Marks,” both of you. :wink: