Medical research start

Dear Forum,

after buying TB last year life, work and corona got in the way so I never really could get started. Next to my primary job as an ICT attending I do research in pain medicine and would love to get started using Tinderbox. I would need to create notes for digested / summarized references, subpoints or excerpts from references and thought outline. Also, making new connections accross different publications understanding a certain field or train of thought better would help. I will have to work with pictures / pdf’s embedded./ will use hook links to bookends references


I really like the looks of the note and usage cased that is used to introduce Tinderbox on the homepage:

https://www.eastgate.com/Tinderbox/Using/WritingChemistry.html

can anyone give me pointers on how to create a notecard looking like this / with the same attributes? maybe the author is a forum member and I can pm him and kindly ask for the template? I am glad to finally be able to get started and dig into my data once more. this seems like a great place and I’ve enjoyed reading up on what you guys do. As a caveat, I am not an apple scipt user nor do I understand coding


cheers, stay safe,

J.

Hi – not a direct answer to your question, but be aware that the image on that page is not the current version of Tinderbox. It is version 4 or 5. The look and feel of Tinderbox changed dramatically with version 6. That example predates that change.

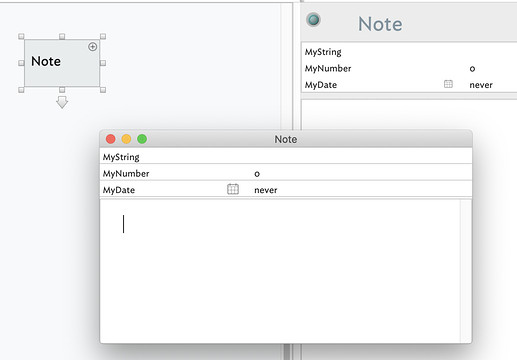
The closest visual analog would be to use the “Text Window” option while selecting a note:

The author of the example you linked to is William Beck (per that article). He is not a current member, as far as I know. Perhaps @eastgate can direct you further.

Welcome to the community. Excited to see you here.

There are a number of resources to help you get started with Tinderbox. First, there is this forum. This is one of the best places to start. Also, there are some helpful resources and examples,

  • Tinderbox Help Menu, under the Tinderbox Help Menu you find a number of useful links, including the Action & Dashboards which includes a sample TBX file you can walk yourself through to understand how various aspects of Tinderbox works.
  • A Tinderbox Reference file, will be one of your most valuable go-to resources. It was developed and maintained by longterm Tinderbox user, @mwra, who is an invaluable resource to the community
  • Wednesday night and Saturday morning meetups, the community holds regular meetups to discuss Tinderbox and share insights, you can learn more here.

Personally, I find there are a few basic concepts that are really helpful to understand. First off, Tinderbox is the ideal tool to collect insights, curate them, create your own, and then contribute (publish); this is what I call the 4Cs. Then there are the core elements of Tinderbox,

  • Notes, Tinderbox is built around the note, i.e. containers that you can name and store your insights in.
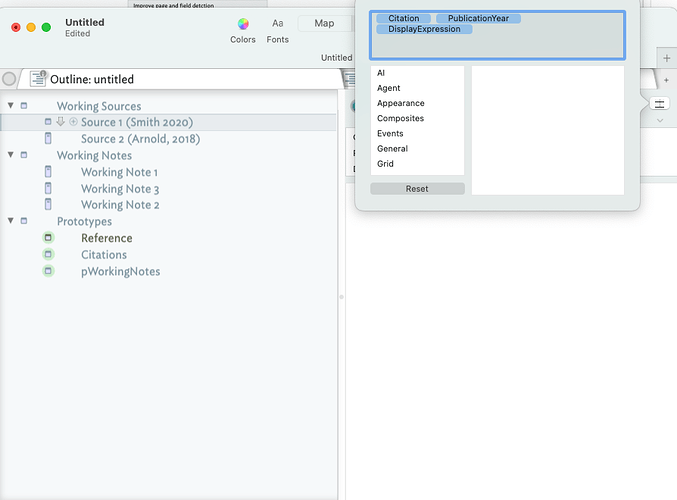
  • Attribute, attributes are the metadata and instructions that you can associate with your notes and to tell Tinderbox what to do. There are system-level attributes, like $Color (i.e. tell Tinderbox what color to make your note), and user-generated attributes. For me, the big insight was that every attribute in Tinderbox is already associated with every note. When you look at a note and you see some attributes shown, as in the link you shared, this just means that you’ve chosen to display those particular attributes with that note. In the top-right corner of a note, you’ll see a “Display Attributes” button. You can use the window that appears after clicking on this button to select which attributes you want to display. If you type in an attribute that does not exists in the system, i.e. generate a user-generated attribute, once you click out of the field you’ll be invited to “create” the attribute. To create your attribute all you need to do is click the create checkbox and select the type of attribute you want (e.g. string, date, URL, etc.); the moment you click out of the pop-up your attribute will be created. If you don’t check create Tinderbox will simply ignore and forgot the new attribute. You can remove an attribute from a note’s view by selecting it in the list and clicking delete, or if you want to do this with multiple attributes open the attribute display and remove multiple attributes at once, and to do it across multiple notes do this in the prototype’s attribute display. This action is NOT deleting the attribute, it is just removing it from view.
  • Prototypes, TBX defines applying prototypes as " a method to let a single note specify the default value for an entire class of notes." For me, the close analogy for this is a template or style (not to be confused with how other apps user these terms). You can assign, aka apply, a prototype to a bunch of notes and all those notes will take on the default value of the prototype (pre-set shape, size, colors, default displayed aspects of the note, i.e. the default values for attributes, etc.). Prototypes have a characteristic called inheritance, meaning when you update a prototype all relevant elements of notes assigned to this prototype will be updated. There are all kinds of built-in prototypes (look for these under the file menu). You can also create your own. To apply or change a note’s prototype, in Map View rt. mouse click on the bottom with the corner of the note and select the prototype you want from the list, in Outline view rt. mouse click on the window icon to the left of the note and select the prototype you want to apply.
  • Action code, once you understand the notes and attributes you can leverage Tinderbox’s action code to query notes, modify and otherwise manipulate attributes, and other notes, and so much more (more on this later)
  • Exporting and export code, once you’re ready to get your data out of Tinderbox, you can export it, see the Export option under the file menu. Once you get more familiar with Tinderbox you can refine the export is really granular ways using export code, which helps you to format your export and data (more on this later)
  • Toolbars, Tinderbox opens with the Toolbars and menus off, as it does not want to presume that you need them. You’ll find these in the menus. The three I find most useful are the Toolbar (press ⌄+⌘+T to view it), the Text Pane Selector (you’ll find this in the Window menu, and the Ruler (press ctrl+⌘+R to view it), this will show the text formatting.

I encourage you to play with these elements above.

As for embedding images and files in your Tinderbox, so that your Tinderbox does not get too big, this is best done by linking your note to the file or image on your hard drive and not embedding the file (i.e. pasting it directly into Tinderbox). For file management, you can use your computer’s directories or many people find Devonthink very useful. Simply drag the file from you Finder to a user-generated Tinderbox file attribute and you can link your file; click on the file icon to the left of the URL in the attribute and Tinderbox will open the file. Many prefer using Devonthink with Tinderbox for large file and asset management (you can grab the Devonthink URL for the file to link to it from Tinderbox). For linking images, you can use basic HTML which we’d be happy to show you how to do later (it’s really easy, but I don’t to distract you with this just yet).

Please see the attached file I just pulled together (took about five minutes), DrCox.tbx (89.1 KB)

Hopefully, you can use it and the notes above to start familiarizing yourself with creating notes, applying different prototypes, creating and managing attributes, etc. Later we can show you how to link notes, run actions, link files and images, etc. We can also show you how to “meta-think” with Tinderbox; I’d love to explore this with you as I’m still learning too.

Please let me know if you’ve found any of the above useful. If any of it was confusing, please let me know that too so that I can update this intro for future use. I’d like to know what I should keep, delete, do differently. And, of course, as you explore Tinderbox and have more questions don’t hesitate to ask the community for help. We’re all here for each other.
5 Likes

It’s also useful to know that this list of displayed attributes is itself stored in an Attribute ($KeyAttributes). That means you can use a Prototype to create a consistent look in new notes. It also means that if you decide you need a new attribute you can create it, make it a KeyAttribute for the relevant Prototype, and thereby populate it across a collection of notes very quickly.

3 Likes

A recent release of Tinderbox replaced the term “KeyAttributes” with “DisplayedAttributes”. So now we have $DisplayedAttributes and related attribute names.

1 Like

My copy actually has both “Key” and “Displayed.” Grandfathered for existing files, I’m guessing?

Katherine

1 Like

Yes, you are quite right, and no foul! Play continues. Background: ‘Key Attributes’ were recently renamed ‘Displayed Attributes’ to help new users avoid the sense that those attributes were special beyond the user choosing to display them. This reflected new users asking why there attribute were ‘key, and misunderstanding their role’.

‘grandfathering’? Yes. this is needed or pre-existing TBX files might break. Documentation has is being updated to reflect the change. But, as Displayed Attributes go back to the dawn of the Tinderbox era (20+ years)—several epochs in PC time—old examples will wash around the net for a while yet. :open_mouth:

So, your guess is quite correct and thanks for posting that in case no one else did. :slight_smile:

1 Like

Wow, this is brilliant. Will try my hands on that file you created and try to understand all your instructions tomorrow. This is a great kickstart. I appreciate the offer of walking me through additional steps that I will surely take you up on, once I get into the flow. Thanks to everyone else for chiming in as well. This truly is a great place!

Please stay safe, cheers.

Johannes

2 Likes

My pleasure. Brings me a lot of joy to share. When you’re ready, we’ll take you to the next step and show you how to pull in files and images. :slight_smile:

2 Likes

Please visit the DEVONthink forum, there’s a script waiting for a test :slight_smile:

Hi Pete
I found it
used it
modified it
published new changes. Simply, wow. Five (5) days ago I’d never touched Apple Script. Who know I could do this? Very cool. Filled with gratitude. Thank you.

2 Likes

How are your efforts progressing?

Merry Christmas, thanks for inquiring. Slowly progressing, only, I’m afraid. Downloaded your TB File and dabbed a bit. Localized the Beck Tench videos and schedule to watch them. Apart, on-call commitments got in the way. Took the chance to purchase the yearly update for TB. Apologies for my lack of progress so far. Will be in touch. Keep safe and happy holidays

No apologies necessary
just thought I’d reach out and say hi.

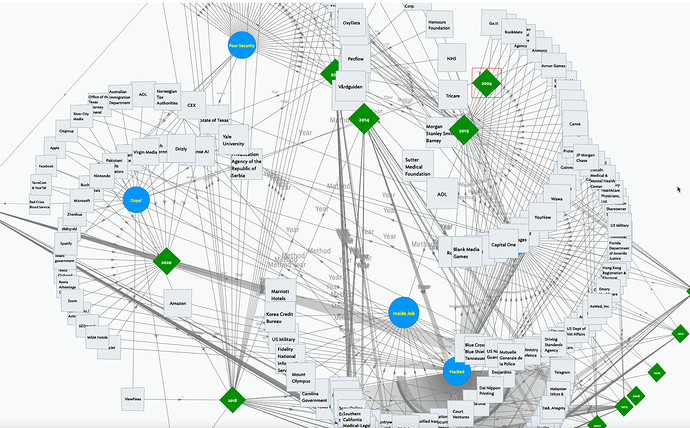
Check this out BTW, I figured out early this morning how to do some really cool visualization with Tinderbox, this is a visualization of 362 of the largest data breaches since 2004:

It is truly amazing what you can do with this tool.

that’s a brilliant graphical display
 might be a bit overwhelming, though?! What connections / Insights did that particular graph reveal to you?

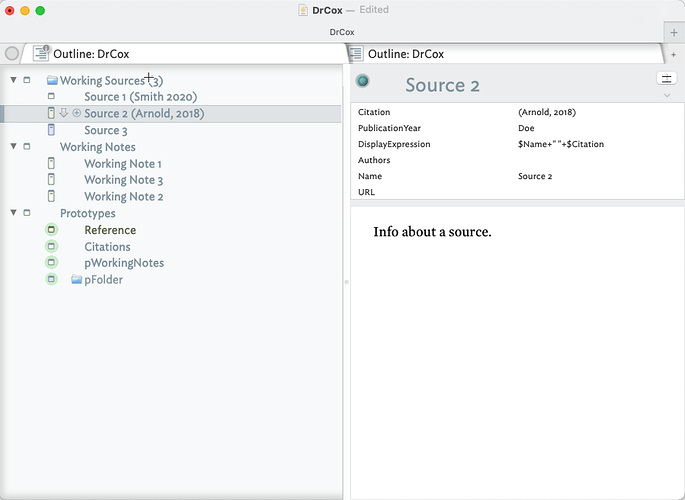
quick question while playing around, why has the point “display expression” this filled in: $Name+" "+$Citation

can I use plain text to fill in or is their a deeper meaning here

Any reason why you created “reference” and “citations” prototypes similar but different? In the end they just serve as examples, right, that can be adapted at will?

Quite a few, actually
I actually still digging into the data, but what I’m looking for is hidden connections that I may not see otherwise just by looking at the numbers. This view helps me get familiar with the data, as the view moves around when I click on different notes.
Visually I can see,

  • which data breaches generated the most losses
  • which years had the most breaches

It is a fun exploration that helps you see your data through a different lens.

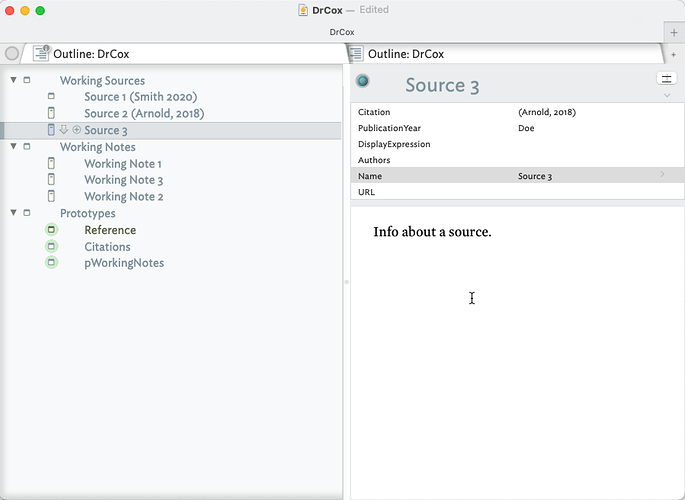
Ah, great question. See the image below. I like to have discrete information in different attributes, this helps with analysis and data management, however, I want to be able to eyeball data about various notes when in different views: for example, I like to visually see the title of the name of a note along with its citation. Or, as in the other image below I like to see the number of items in a folder, e.g. $DisplayExpression=$Name+" (“$ChildCount+”)"; (I added a new prototype called folder which has a different $Badge and $DisplayExpression).

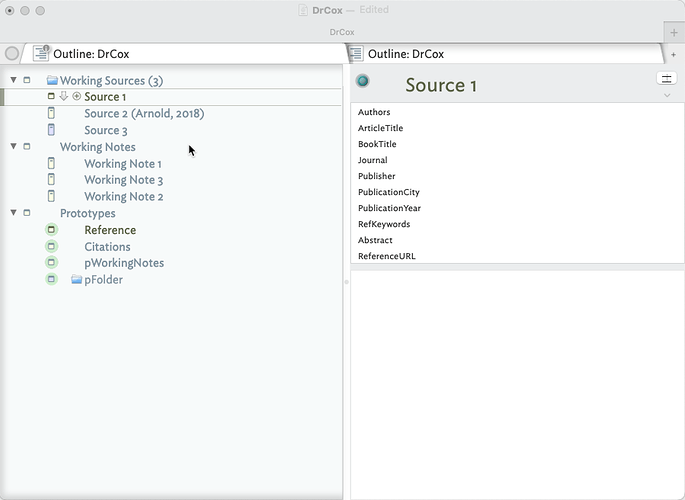
So, what am I doing? I’m using the $DisplayExpressions attribute to change the visual look of the notes, e.g. having a note appear as Source 1 (Smith, 2020) by combining two other attributes in $DisplayExpressions, while leaving the individual attributes $Name and $Citations alone. See the image below. I created a new note, deleted the value of $DisplayExpress in this note and so now it only displays the $Name. These tricks, for me, help with data exploration and familiarisation.

If you get a really big file, using this technique can slow your file down, however. I’ve recently learned another method that caches display expression and thus reduces the processing load on the file. We can discuss this later once you start getting a ton of notes, for now, let’s try to keep it simple.

1 Like

Yes, to give you a couple of prototypes you could use to play around with. For example, if I apply the reference prototype to Source 1 you’ll see that the notes color changes as does the displayed name. Is this explanation helpful?

A bit incomprehensible perhaps?